Sending a program to a microcontroller (which is most often called “programming” the device) can be done in multiple ways. For example, one can do it through the use of ICSP headers and dedicated hardware programmers. In the Arduino world the usage of bootloaders is extremely common, since it is what allows you to program your device directly through the Serial (USB) connection. This blog post will explore how we can upload a compiled program (in its Intel HEX form) to an Arduino UNO directly, by interacting with the device’s bootloader from C#.
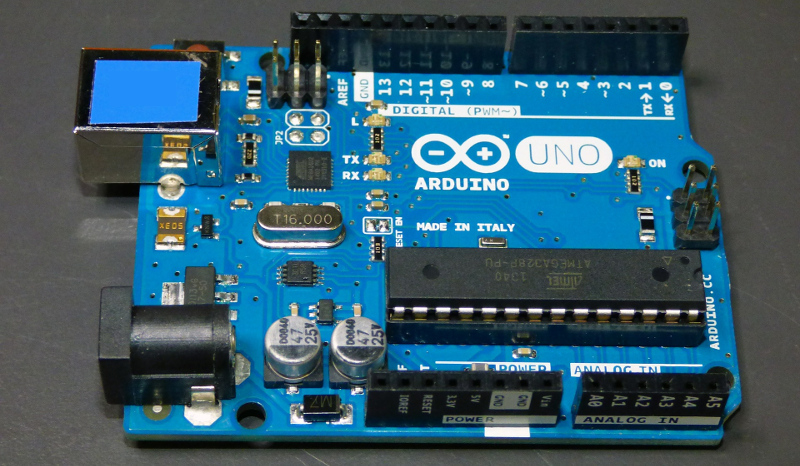
Arduino Bootloaders
A bootloader is a small, specialized piece of software on your microcontroller that runs first whenever your board powers on. It provides at least the following functions:
- provide a way to upload new programs to the device
- start (“bootstrap”) the main program
Once the bootloader has given control to the main program, the latter will keep on running indefinitely.
Specific types of Arduino’s come preinstalled with a certain “flavour” of bootloader. You can change your bootloader or perhaps you don’t even have one installed (for example, when you ordered ATMega chips directly). When in doubt, one can always use Nick Gammon’s Atmega_Board_Detector (requires 2 Arduinos) in order to identify the currently installed bootloader.
The most common Arduino bootloaders implement (a subset of) upload protocols that originate with Atmel (e.g. STK500v1 & STK500v2). These (binary) protocols are quite well documented.
This blog post will focus exclusively on the following combination of elements (as we find them in a modern Arduino UNO): ATMega328P (MCU) - Optiboot (bootloader) - STK500v1 (upload protocol).
How the Arduino IDE uploads a program
Toggle “Show verbose output” for both compilation and upload in the IDE’s preferences.
As of today (Arduino IDE version 1.6.11) the process is two-pronged:
Compilation: the IDE calls
avr-gccin order to compile your source code (Arduino sketches are really nothing more than regular C++ code with some domain specific libraries). The end result of this step is a binary file in Intel HEX format. At the end of the verbose output, you will be able to see exactly where these files end up on your filesystem.Linking everything together... "C:\Program Files (x86)\Arduino\hardware\tools\avr/bin/avr-gcc" -Os -flto -fuse-linker-plugin -Wl,--gc-sections,--relax -mmcu=atmega2560 -o "C:\Users\chris\AppData\Local\Temp\build9c9ef3bdfe2fccb480bc6e4bac749e41.tmp/Blink.ino.elf" "C:\Users\chris\AppData\Local\Temp\build9c9ef3bdfe2fccb480bc6e4bac749e41.tmp\sketch\Blink.ino.cpp.o" "C:\Users\chris\AppData\Local\Temp\build9c9ef3bdfe2fccb480bc6e4bac749e41.tmp/core\core.a" "-LC:\Users\chris\AppData\Local\Temp\build9c9ef3bdfe2fccb480bc6e4bac749e41.tmp" -lm "C:\Program Files (x86)\Arduino\hardware\tools\avr/bin/avr-objcopy" -O ihex -j .eeprom --set-section-flags=.eeprom=alloc,load --no-change-warnings --change-section-lma .eeprom=0 "C:\Users\chris\AppData\Local\Temp\build9c9ef3bdfe2fccb480bc6e4bac749e41.tmp/Blink.ino.elf" "C:\Users\chris\AppData\Local\Temp\build9c9ef3bdfe2fccb480bc6e4bac749e41.tmp/Blink.ino.eep" "C:\Program Files (x86)\Arduino\hardware\tools\avr/bin/avr-objcopy" -O ihex -R .eeprom "C:\Users\chris\AppData\Local\Temp\build9c9ef3bdfe2fccb480bc6e4bac749e41.tmp/Blink.ino.elf" "C:\Users\chris\AppData\Local\Temp\build9c9ef3bdfe2fccb480bc6e4bac749e41.tmp/Blink.ino.hex"You can open up the .HEX file in a regular text editor (since it stores information in an ASCII form):

Note: For those interested in how to parse the Intel Hex file structure, have a look at the following .NET project on GitHub: IntelHexFormatReader.
Upload: the IDE calls a tool called
avrdude(homepage) which originated on FreeBSD and has been the de facto standard (for many years) for uploading programs to all kinds of microcontrollers. In the output you can see how it will “flash” the .HEX file generate in the previous step ( to COM port 4, at a baud rate of 115200 bps, with an “arduino” type programmer, targetting the ATMega328P chip on the UNO):C:\Program Files (x86)\Arduino\hardware\tools\avr/bin/avrdude -CC:\Program Files (x86)\Arduino\hardware\tools\avr/etc/avrdude.conf -v -patmega328p -carduino -PCOM4 -b115200 -D -Uflash:w:C:\Users\chris\AppData\Local\Temp\build9c9ef3bdfe2fccb480bc6e4bac749e41.tmp/Blink.ino.hex:i
We will take the .HEX file as generated by the compilation process and upload that directly to the UNO (thereby foregoing avrdude directly).
Uploading the .HEX file with C#
From a high level perspective, we will execute the following steps:
- Configure and open the serial port connection.
- Establish sync
- Check the device signature
- Initialize the device
- Enable programming mode
- Program the device
- Leave programming mode
Important reference: Documentation of the STK500 protocol.
The following constants will be used in the code below:
namespace ArduinoUploader.Protocols.STK500v1
{
    internal static class Constants
    {
        internal const byte CMD_STK_GET_SYNC                    = 0x30;
        internal const byte CMD_STK_GET_PARAMETER               = 0x41;
        internal const byte CMD_STK_SET_DEVICE                  = 0x42;
        internal const byte CMD_STK_ENTER_PROGMODE              = 0x50;
        internal const byte CMD_STK_LEAVE_PROGMODE              = 0x51;
        internal const byte CMD_STK_LOAD_ADDRESS                = 0x55;
        internal const byte CMD_STK_PROG_PAGE                   = 0x64;
        internal const byte CMD_STK_READ_PAGE                   = 0x74;
        internal const byte CMD_STK_READ_SIGNATURE              = 0x75;

        internal const byte SYNC_CRC_EOP                        = 0x20;

        internal const byte RESP_STK_OK                         = 0x10;
        internal const byte RESP_STK_Failed                     = 0x11;
        internal const byte RESP_STK_NODEVICE                   = 0x13;
        internal const byte RESP_STK_INSYNC                     = 0x14;
        internal const byte RESP_STK_NOSYNC                     = 0x15;

        internal const byte PARM_STK_SW_MAJOR                   = 0x81;
        internal const byte PARM_STK_SW_MINOR                   = 0x82;
    }
}
1. Configure and open the serial port
Instantiate a serial port instance (of type System.IO.Ports.SerialPort) first, with the port name pointing to the actual
port where the Arduino is attached, at a baud rate of 115200 bps (as that is the speed used to communicate with the Optiboot bootloader).
We will reset the Arduino first, as that is the only way to get the bootloader code to run again. There is only a short interval available after powering up the board (where the bootloader listens for a potential upload). After that, it will call the entrypoint to the main program. Resetting an Arduino UNO can be done by toggling DTR/RTS:
SerialPort.DtrEnable = false;
SerialPort.RtsEnable = false;

Thread.Sleep(250);

SerialPort.DtrEnable = true;
SerialPort.RtsEnable = true;

Thread.Sleep(50);
2. Establish sync
We will start by establishing sync. The documentation has the following notes with regards to this command:

Here is how we will implement this:
...

public override void EstablishSync()
{
    int i;
    for (i = 0; i < MaxSyncRetries; i++)
    {
        Send(new GetSyncRequest());
        var result = Receive<GetSyncResponse>();
        if (result == null) continue;
        if (result.IsInSync) break;
    }

    if (i == MaxSyncRetries)
        UploaderLogger.LogAndThrowError<IOException>(
            string.Format(
                "Unable to establish sync after {0} retries.",
                MaxSyncRetries));

    var nextByte = ReceiveNext();

    if (nextByte != Constants.RESP_STK_OK)
        UploaderLogger.LogAndThrowError<IOException>(
            "Unable to establish sync.");
}

...

protected virtual void Send(IRequest request)
{
    var bytes = request.Bytes;
    var length = bytes.Length;
    logger.Trace(
        "Sending {0} bytes: {1}{2}",
        length, Environment.NewLine, BitConverter.ToString(bytes));
    SerialPort.Write(bytes, 0, length);
}

...

protected TResponse Receive<TResponse>(int length = 1) where TResponse : Response
{
    var bytes = ReceiveNext(length);
    if (bytes == null) return null;

    var result = (TResponse) Activator.CreateInstance(typeof(TResponse));
    result.Bytes = bytes;
    return result;
}

...

protected byte[] ReceiveNext(int length)
{
    var bytes = new byte[length];
    var retrieved = 0;
    try
    {
        while (retrieved < length)
            retrieved += SerialPort.Read(bytes, retrieved, length - retrieved);

        logger.Trace("Receiving bytes: {0}", BitConverter.ToString(bytes));
        return bytes;
    }
    catch (TimeoutException)
    {
        return null;
    }
}
internal class GetSyncRequest : Request
{
public GetSyncRequest()
{
Bytes = new[]
{
Constants.CMD_STK_GET_SYNC,
Constants.SYNC_CRC_EOP
};
}
}internal class GetSyncResponse : Response
{
public bool IsInSync
{
get
{
return Bytes.Length > 1
&& Bytes[0] == Constants.CMD_SIGN_ON
&& Bytes[1] == Constants.STATUS_CMD_OK;
}
}
public string Signature
{
get
{
var signatureLength = Bytes[2];
var signature = new byte[signatureLength];
Buffer.BlockCopy(Bytes, 3, signature, 0, signatureLength);
return Encoding.ASCII.GetString(signature);
}
}
}3. Check the device signature
We will send a command to make sure we are talking to the correct device.
This is what the documentation has:
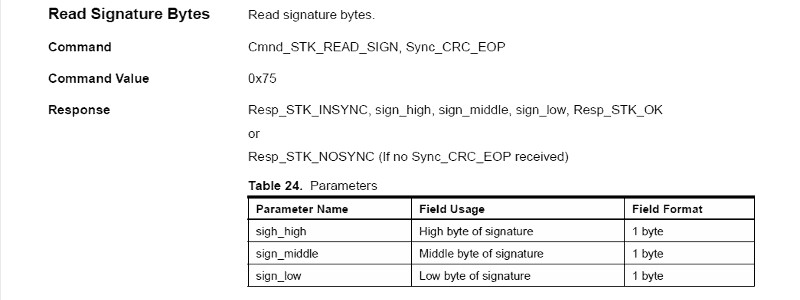
Here is how we will implement it:
private const string EXPECTED_DEVICE_SIGNATURE = "1e-95-0f";

...

public override void CheckDeviceSignature()
{
    logger.Debug("Expecting to find '{0}'...", EXPECTED_DEVICE_SIGNATURE);
    SendWithSyncRetry(new ReadSignatureRequest());
    var response = Receive<ReadSignatureResponse>(4);
    if (response == null || !response.IsCorrectResponse)
        UploaderLogger.LogAndThrowError<IOException>(
            "Unable to check device signature!");

    var signature = response.Signature;
    if (signature[0] != 0x1e || signature[1] != 0x95 || signature[2] != 0x0f)
        UploaderLogger.LogAndThrowError<IOException>(
            string.Format(
                "Unexpected device signature - found '{0}'- expected '{1}'.",
                BitConverter.ToString(signature),
                EXPECTED_DEVICE_SIGNATURE));
}

...

protected void SendWithSyncRetry(IRequest request)
{
    byte nextByte;
    while (true)
    {
        Send(request);
        nextByte = (byte) ReceiveNext();
        if (nextByte == Constants.RESP_STK_NOSYNC)
        {
            EstablishSync();
            continue;
        }
        break;
    }
    if (nextByte != Constants.RESP_STK_INSYNC)
        UploaderLogger.LogAndThrowError<IOException>(
            string.Format(
                "Unable to aqcuire sync in SendWithSyncRetry for request of type {0}!",
                request.GetType()));
}
internal class ReadSignatureRequest : Request
{
public ReadSignatureRequest()
{
Bytes = new[]
{
Constants.CMD_STK_READ_SIGNATURE,
Constants.SYNC_CRC_EOP
};
}
}internal class ReadSignatureResponse : Response
{
public bool IsCorrectResponse
{
get { return Bytes.Length == 4 && Bytes[3] == Constants.RESP_STK_OK; }
}
public byte[] Signature
{
get { return new[] { Bytes[0], Bytes[1], Bytes[2] }; }
}
}4. Initialize the device
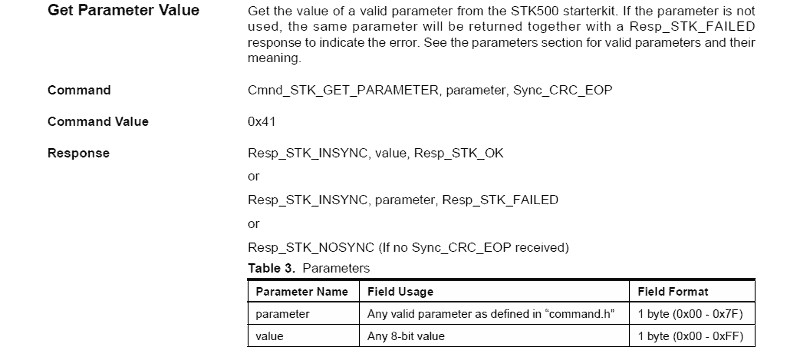
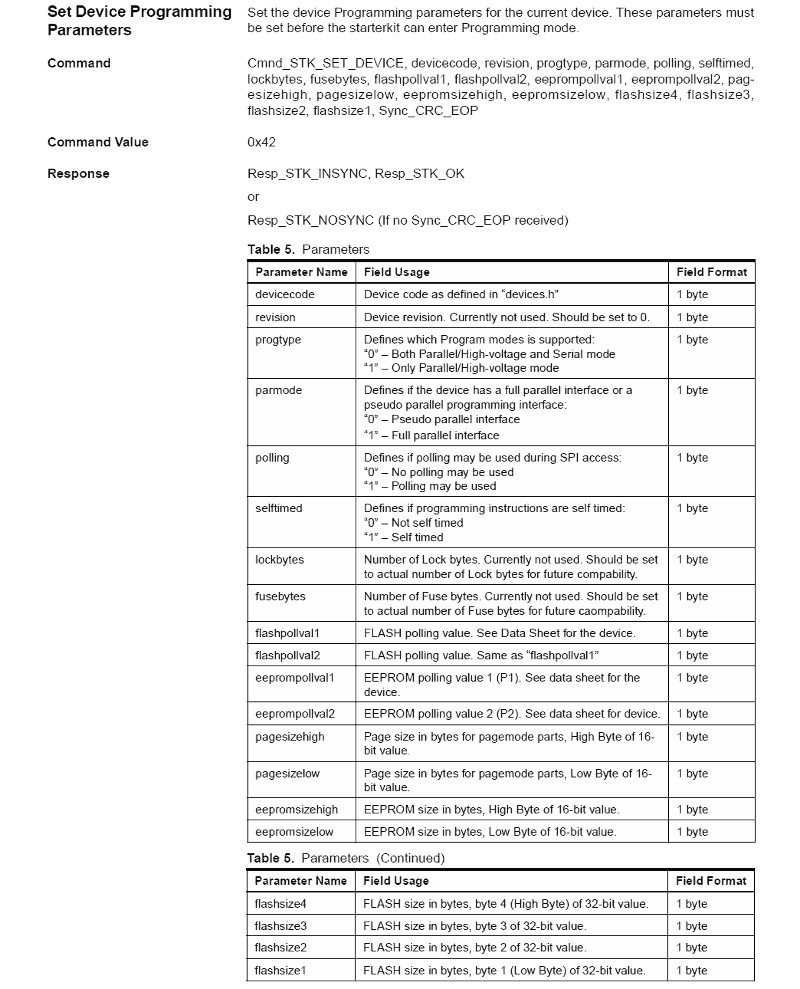
We will first issue commands to retrieve the current software version (major, minor). Then, we will issue a command to set programming parameters for the request:
Relevant parts of the documentation:
public override void InitializeDevice()
{
    var majorVersion = GetParameterValue(Constants.PARM_STK_SW_MAJOR);
    var minorVersion = GetParameterValue(Constants.PARM_STK_SW_MINOR);
    logger.Info("Retrieved software version: {0}.",
        string.Format("{0}.{1}", majorVersion, minorVersion));

    logger.Info("Setting device programming parameters...");
    SendWithSyncRetry(new SetDeviceProgrammingParametersRequest((MCU)MCU));
    var nextByte = ReceiveNext();

    if (nextByte != Constants.RESP_STK_OK)
        UploaderLogger.LogAndThrowError<IOException>(
            "Unable to set device programming parameters!");
}

...

private uint GetParameterValue(byte param)
{
    logger.Trace("Retrieving parameter '{0}'...", param);
    SendWithSyncRetry(new GetParameterRequest(param));
    var nextByte = ReceiveNext();
    var paramValue = (uint)nextByte;
    nextByte = ReceiveNext();

    if (nextByte == Constants.RESP_STK_Failed)
        UploaderLogger.LogAndThrowError<IOException>(
            string.Format("Retrieving parameter '{0}' failed!", param));

    if (nextByte != Constants.RESP_STK_OK)
        UploaderLogger.LogAndThrowError<IOException>(
            string.Format(
                "General protocol error while retrieving parameter '{0}'.",
                param));

    return paramValue;
}
internal class GetParameterRequest : Request
{
public GetParameterRequest(byte param)
{
Bytes = new[]
{
Constants.CMD_STK_GET_PARAMETER,
param,
Constants.SYNC_CRC_EOP
};
}
}internal class SetDeviceProgrammingParametersRequest : Request
{
public SetDeviceProgrammingParametersRequest(IMCU mcu)
{
var flashMem = mcu.Flash;
var eepromMem = mcu.EEPROM;
var flashPageSize = flashMem.PageSize;
var flashSize = flashMem.Size;
var epromSize = eepromMem.Size;
Bytes = new byte[22];
Bytes[0] = Constants.CMD_STK_SET_DEVICE;
Bytes[1] = mcu.DeviceCode;
Bytes[2] = mcu.DeviceRevision;
Bytes[3] = mcu.ProgType;
Bytes[4] = mcu.ParallelMode;
Bytes[5] = mcu.Polling;
Bytes[6] = mcu.SelfTimed;
Bytes[7] = mcu.LockBytes;
Bytes[8] = mcu.FuseBytes;
Bytes[9] = flashMem.PollVal1;
Bytes[10] = flashMem.PollVal2;
Bytes[11] = eepromMem.PollVal1;
Bytes[12] = eepromMem.PollVal2;
Bytes[13] = (byte) ((flashPageSize >> 8) & 0x00ff);
Bytes[14] = (byte) (flashPageSize & 0x00ff);
Bytes[15] = (byte) ((epromSize >> 8) & 0x00ff);
Bytes[16] = (byte) (epromSize & 0x00ff);
Bytes[17] = (byte) ((flashSize >> 24) & 0xff);
Bytes[18] = (byte) ((flashSize >> 16) & 0xff);
Bytes[19] = (byte) ((flashSize >> 8) & 0xff);
Bytes[20] = (byte) (flashSize & 0xff);
Bytes[21] = Constants.SYNC_CRC_EOP;
}
}For this SetDeviceProgrammingParametersRequest our currently configured MCU (ATMega328P) hardware definition is used
as well:
internal class ATMega328P : MCU
{
    public override byte DeviceCode { get { return 0x86; } }
    public override byte DeviceRevision { get { return 0; } }
    public override byte ProgType { get { return 0; } }
    public override byte ParallelMode { get { return 1; } }
    public override byte Polling { get { return 1; } }
    public override byte SelfTimed { get { return 1; } }
    public override byte LockBytes { get { return 1; } }
    public override byte FuseBytes { get { return 3; } }

    public override byte Timeout { get { return 200; } }
    public override byte StabDelay { get { return 100; } }
    public override byte CmdExeDelay { get { return 25; } }
    public override byte SynchLoops { get { return 32;  } }
    public override byte ByteDelay { get { return 0; } }
    public override byte PollIndex { get { return 3; } }
    public override byte PollValue { get { return 0x53; } }

    public override IDictionary<Command, byte[]> CommandBytes
    {
        get { return new Dictionary<Command, byte[]>(); }
    }

    public override IList<IMemory> Memory
    {
        get
        {
            return new List<IMemory>()
            {
                new FlashMemory()
                {
                    Size = 32 * 1024,
                    PageSize = 128,
                    PollVal1 = 0xff,
                    PollVal2 = 0xff
                },
                new EEPROMMemory()
                {
                    Size = 1024,
                    PollVal1 = 0xff,
                    PollVal2 = 0xff
                }
            };
        }
    }
}
internal abstract class MCU : IMCU
{
public abstract byte DeviceCode { get; }
public abstract byte DeviceRevision { get; }
public abstract byte LockBytes { get; }
public abstract byte FuseBytes { get; }
public abstract byte Timeout { get; }
public abstract byte StabDelay { get; }
public abstract byte CmdExeDelay { get; }
public abstract byte SynchLoops { get; }
public abstract byte ByteDelay { get; }
public abstract byte PollValue { get; }
public abstract byte PollIndex { get; }
public virtual byte ProgType { get { return 0; } }
public virtual byte ParallelMode { get { return 0; } }
public virtual byte Polling { get { return 1; } }
public virtual byte SelfTimed { get { return 1; } }
public abstract IDictionary<Command, byte[]> CommandBytes { get; }
public IMemory Flash
{
get { return Memory.SingleOrDefault(x => x.Type == MemoryType.FLASH); }
}
public IMemory EEPROM
{
get { return Memory.SingleOrDefault(x => x.Type == MemoryType.EEPROM); }
}
public abstract IList<IMemory> Memory { get; }
}5. Enable programming mode
We will send a command to enter “program mode”.
The relevant documentation entry:
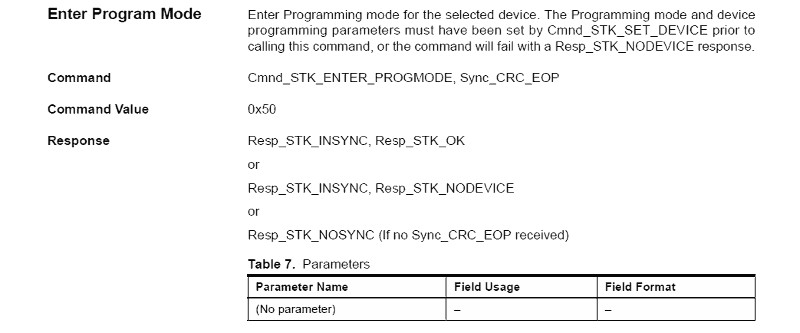
The implementation:
public override void EnableProgrammingMode()
{
    SendWithSyncRetry(new EnableProgrammingModeRequest());
    var nextByte = ReceiveNext();
    if (nextByte == Constants.RESP_STK_OK) return;
    if (nextByte == Constants.RESP_STK_NODEVICE || nextByte == Constants.RESP_STK_Failed)
        UploaderLogger.LogAndThrowError<IOException>(
            "Unable to enable programming mode on the device!");
}
internal class EnableProgrammingModeRequest : Request
{
public EnableProgrammingModeRequest()
{
Bytes = new[]
{
Constants.CMD_STK_ENTER_PROGMODE,
Constants.SYNC_CRC_EOP
};
}
}6. Program the device
This method takes a MemoryBlock (a type from IntelHexFormatReader that has
the “memory” representation of the HEX file after interpreting the records in it) and
iterates over its contents (per page).
If a page has any byte set to “modified” (as per the HEX file), we will mark it as needsWrite. This way, we will only
write to the pages required. Even if a page is needsWrite, we will first read the contents of the page and compare it
to the write payload. That way (e.g. if you are flashing the same program over and over again) we can conserve
(finite and thus precious) write cycles. After the read, we will read the page again (in order to verify that the
contents have been written perfectly).
public virtual void ProgramDevice(MemoryBlock memoryBlock)
{
    var sizeToWrite = memoryBlock.HighestModifiedOffset + 1;
    var flashMem = MCU.Flash;
    var pageSize = flashMem.PageSize;
    logger.Info("Preparing to write {0} bytes...", sizeToWrite);
    logger.Info("Flash page size: {0}.", pageSize);

    int offset;
    for (offset = 0; offset < sizeToWrite; offset += pageSize)
    {
        var needsWrite = false;
        for (var i = offset; i < offset + pageSize; i++)
        {
            if (!memoryBlock.Cells[i].Modified) continue;
            needsWrite = true;
            break;
        }
        if (needsWrite)
        {
            logger.Debug(
                "Executing paged write @ address {0} (page size {1})...",
                offset, pageSize);

            var bytesToCopy =
                memoryBlock.Cells.Skip(offset)
                    .Take(pageSize).Select(x => x.Value).ToArray();

            logger.Trace(
                "Checking if bytes at offset {0} need to be overwritten...",
                offset);

            var bytesAlreadyPresent = ExecuteReadPage(flashMem, offset);
            if (bytesAlreadyPresent.SequenceEqual(bytesToCopy))
            {
                logger.Trace(
                    "Bytes are identical to bytes present - skipping write!");
                continue;
            }
            logger.Trace("Writing page at offset {0}.", offset);
            ExecuteWritePage(flashMem, offset, bytesToCopy);
            logger.Trace("Page written, now verifying...");

            var verify = ExecuteReadPage(flashMem, offset);
            var succeeded = verify.SequenceEqual(bytesToCopy);
            if (!succeeded)
                UploaderLogger.LogAndThrowError<IOException>(
                    "Difference encountered during verification, write failed!");
        }
        else
        {
            logger.Trace("Skip writing page...");
        }
    }
    logger.Info("{0} bytes written to flash memory!", sizeToWrite);
}
In the method above, we used three distinct commands:
- Read a page
- Write a page
- Load a specific memory address
Here are the relevant parts of the documentation:
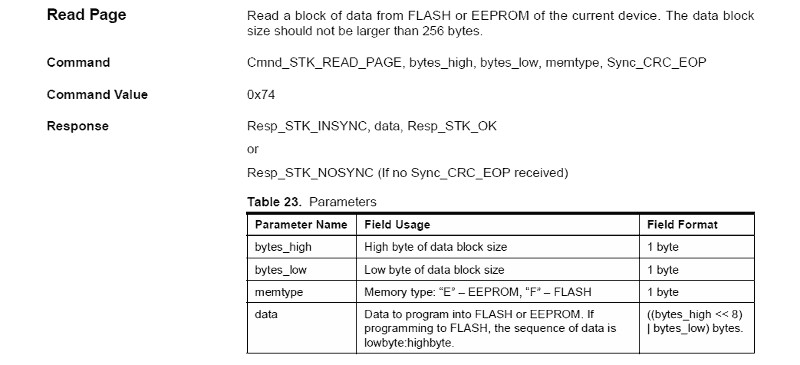
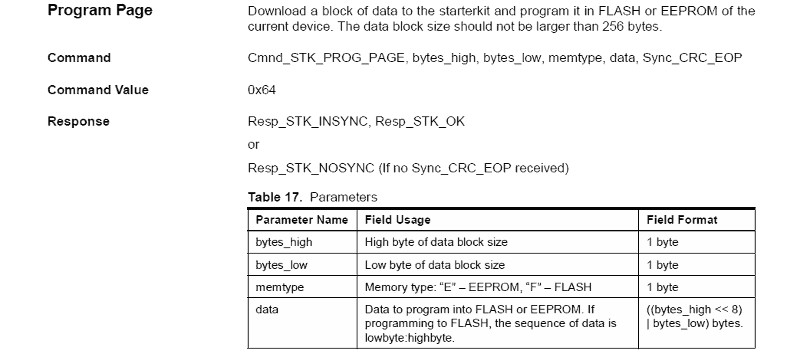
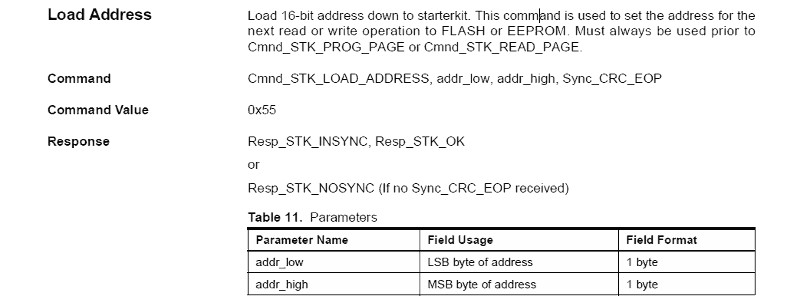
public override byte[] ExecuteReadPage(IMemory memory, int offset)
{
    var pageSize = memory.PageSize;
    LoadAddress(offset);
    SendWithSyncRetry(new ExecuteReadPageRequest(memory.Type, pageSize));
    var bytes = ReceiveNext(pageSize);
    if (bytes == null)
    {
        UploaderLogger.LogAndThrowError<IOException>(
            string.Format("Read at offset {0} failed!", offset));
    }

    var nextByte = ReceiveNext();
    if (nextByte == Constants.RESP_STK_OK) return bytes;
    UploaderLogger.LogAndThrowError<IOException>(
        string.Format("Read at offset {0} failed!", offset));
    return null;
}

...

public override void ExecuteWritePage(IMemory memory, int offset, byte[] bytes)
{
    LoadAddress(offset);
    SendWithSyncRetry(new ExecuteProgramPageRequest(memory, bytes));
    var nextByte = ReceiveNext();
    if (nextByte == Constants.RESP_STK_OK) return;
    UploaderLogger.LogAndThrowError<IOException>(
        string.Format("Write at offset {0} failed!", offset));
}

...

private void LoadAddress(int addr)
{
    logger.Trace("Sending load address request: {0}.", addr);
    addr = addr >> 1;
    SendWithSyncRetry(new LoadAddressRequest(addr));
    var result = ReceiveNext();
    if (result == Constants.RESP_STK_OK) return;
    UploaderLogger.LogAndThrowError<IOException>(
        string.Format("LoadAddress failed with result {0}!", result));
}
internal class ExecuteReadPageRequest : Request
{
public ExecuteReadPageRequest(MemoryType memType, int pageSize)
{
Bytes = new byte[5];
Bytes[0] = Constants.CMD_STK_READ_PAGE;
Bytes[1] = (byte)((pageSize >> 8) & 0xff);
Bytes[2] = (byte)(pageSize & 0xff);
Bytes[3] = (byte)(memType == MemoryType.EEPROM ? 'E' : 'F');
Bytes[4] = Constants.SYNC_CRC_EOP;
}
}internal class ExecuteProgramPageRequest : Request
{
public ExecuteProgramPageRequest(IMemory memory, byte[] bytesToCopy)
{
var size = bytesToCopy.Length;
Bytes = new byte[size + 5];
var i = 0;
Bytes[i++] = Constants.CMD_STK_PROG_PAGE;
Bytes[i++] = (byte)((size >> 8) & 0xff);
Bytes[i++] = (byte)(size & 0xff);
Bytes[i++] = (byte) (memory.Type == MemoryType.EEPROM ? 'E' : 'F');
Buffer.BlockCopy(bytesToCopy, 0, Bytes, i, size);
i += size;
Bytes[i] = Constants.SYNC_CRC_EOP;
}
}internal class LoadAddressRequest : Request
{
public LoadAddressRequest(int address)
{
Bytes = new[]
{
Constants.CMD_STK_LOAD_ADDRESS,
(byte)(address & 0xff),
(byte)((address >> 8) & 0xff),
Constants.SYNC_CRC_EOP
};
}
}7. Leave programming mode
We will send a last command to leave programming mode on the device (both the documentation and the implementation should look fairly predictable by now):
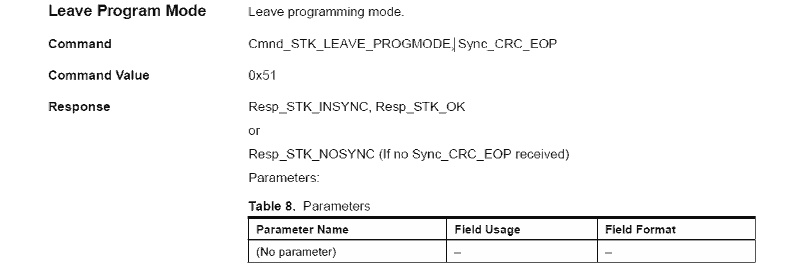
public override void LeaveProgrammingMode()
{
    SendWithSyncRetry(new LeaveProgrammingModeRequest());
    var nextByte = ReceiveNext();
    if (nextByte == Constants.RESP_STK_OK) return;
    if (nextByte == Constants.RESP_STK_NODEVICE || nextByte == Constants.RESP_STK_Failed)
        UploaderLogger.LogAndThrowError<IOException>(
            "Unable to leave programming mode on the device!");
}
internal class LeaveProgrammingModeRequest : Request
{
public LeaveProgrammingModeRequest()
{
Bytes = new[]
{
Constants.CMD_STK_LEAVE_PROGMODE,
Constants.SYNC_CRC_EOP
};
}
}At the very end, it’s important to reset the Arduino again (by toggling DTR/RTS) if we want to immediately start running the freshly uploaded code.
The code
As mentioned at the top of this article, the full .NET library ArduinoSketchUploader (which also supports other architectures, bootloaders than the one dissected above) is available to download on GitHub.. It has a nuget package for those seeking to integrate this feature into their own .NET projects.
Also, a command line utility (at the moment Windows only) is supplied.